
Let’s cut to the chase. Slow WordPress websites suck. Slow WooCommerce websites suck even more. I’m going to show you how to speed up WordPress and WooCommerce like you’ve never seen before!
How to Speed Up WordPress
Contents
WordPress optimization is a problem that every WordPress website owner faces on an ongoing basis – and it doesn’t need to be that way. I’ll show you how 🙂 We’re constantly asked about how to speed up WordPress and WooCommerce and came to the conclusion that the only way to solve this problem was to create a guide that even a WordPress and WooCommerce newbie could follow from start to finish and end up with a website that normally an expert would charges hundreds and thousands of dollars to tune and optimize for you.
There’s countless studies that tell us that as we delve deeper and deeper into the Information Age of hyper competition for our attention, we humans are becoming increasingly impatient. No one likes a slow website. If your WordPress website loads slowly there’s a really good chance that me and everyone else ain’t hanging around for your dumb ass slow website to load. We don’t have the time or patience for that crap. And don’t even think of trying to sell me something on your slow website. Slow eCommerce websites not only suck – they plain straight cost you money – lots of it.
The need for WordPress speed
The best user experiences are fast – really fast. One company who understands this better than anyone else is Google. Google understood just how important speed was before most of the web did. Over time this has only become more apparent in everything Google does. So much so, that Google spent almost 2 billion dollars buying one of the largest office buildings in Manhattan as it was located over one of the most important fibre optic network access junctions in all of the United States.
This mantra of “Speed is King” permeates into every aspect of Google’s operations. But one really vital aspect of this culture of speed that impacts all websites owners massively is Google’s search results algorithms.
Website speed is becoming an increasingly important ranking signal to Search Engine algorithms.
This makes perfect sense from Google’s perspective. The last thing they want to do is to send users to slow websites. This damages Google’s brand. They want us to find what we are looking for quickly. All other things being equal, Google will rank the faster website ahead of the slower one – every single time.
But here’s the problem. For most website owners, WordPress is slow and WooCommerce is even slower.
Why is WordPress so slow?
Like most things in the weird and wonderful world of web development, the answer to this question can be best summarized as “It’s complicated”. WordPress itself isn’t all that slow. It’s not super fast – but it’s not super slow either. The PHP runtime has traditionally not been the fastest either but huge improvements have been made in recent years on that side of the house. The innovation battle between Facebook with HHVM and the core PHP dev team with PHP7 has been to the benefit of us all with massive performances increases across the board as a result.
So if that’s the case why are so many WordPress websites still so slow?
I think there are several big factors that make a slow of WordPress websites slower than they should be. Let’s take a closer look at them.
Crap, slow WordPress hosting
This is a biggie. Simply put, for those who don’t know a lot about the world of WordPress hosting, 90% of WordPress web hosts are crap. They oversell underpowered servers running on technology that rapidly becoming basically obsolete. Their complete focus is on minimizing costs because competition is cut-throat and pricing is a race to the bottom. Web hosts have no shame promising unlimited everything for $5 per month and execute slick marketing campaigns to draw in unsuspecting WordPress newbies to plans that are not at all appropriate for their requirements. Here’s a list of very well known big hosts to avoid:
- GoDaddy
- Bluehost
- Hostgator
If you’re running on an even lower cost host (i.e. $1-2 per month) you’re kidding yourself – you’re on a crap host – it’s only a matter of time before you find this out the hard way. Get out of there today. If you’re on one of the big guys like Bluehost or Hostgator you might be ok for a while but trust me you’ll eventually get burned. I’m speaking from experience.
Right now, the only host I recommend to anyone for WordPress and WooCommerce hosting is Siteground. Right now they are head and shoulders above any other WP host in the world – and that includes the so called premium managed hosts like WPEngine, Kinsta, FlyWheel and so on. We took a closer look at Siteground in our Best WooCommerce hosting guide recently.
Heavy Plugins
You’ll read tons of blog posts about WordPress performance optimization telling you to not install too many plugins. That’s not really the problem when it comes to plugins and WordPress performance optimization. The problem is heavy plugins.
A site running 100 well written light plugins will run faster than a site with 1 heavy plugin.
What constitutes a “heavy plugin”? That’s tricky to be specific about. A heavy plugin could actually be well written, secure, kept up to date, allow third party contributions via github and so on. They might be doing everything “right”. It might just be very database intensive. WooCommerce is a good example of a somewhat heavy plugin. bbPress is another. These are plugins that by their very nature are difficult to cache as they are partially based on uncacheable or hard to cache datasets. For plugins like this, conventional WordPress caching plugins like WP Supercache, W3 Total Cache and WP Rocket are going to be somewhat limited in terms of how effective they can be when it comes to performance optimization as their caching methods generally work best when we’re dealing with data that is suitable for long cache timeframes like evergreen content pages and blog posts that aren’t frequently updated. We’ll take a closer look at this a little bit later to see how we can use other caching methods to help improve the performance of plugins that rely on heavier plugins like WooCommerce and bbPress.
Battling the bulge – WordPress Plugin Obesity
Most WordPress websites probably suffer from some form of “Plugin Obesity“. As we’ve alluded to above, it’s better to think about the effect of plugins on WordPress a lot like the effect of different food types on the body. What exactly constitutes a plugin that is bad for you is a little bit more complex. We all know that food with high levels of sugar, salt and bad fats are not good for us (even though they’re generally delicious!).
But how do you spot a plugin that’s bad for the performance of your WordPress install? Unfortunately that’s much harder to diagnose.
The P3 Plugin does a reasonably decent job at spotting plugins that have a large memory footprint. But sometimes it’s much more nuanced than that and really relies on a lot of experience managing WordPress websites at scale and structured diagnosis. You might have 4 “heavy” plugins installed and 10 light plugins and things are coming to a standstill. But it could be the inter-dependencies of one of your heavy plugins and one of your light plugins that’s slowing down your site. It could even be 2 of your light plugins conflict with each other and bring your site to a standstill. Given the ease of access to thousands of plugins, nearly every single WordPress install is different and needs to be examined on it’s own merits.
The trick is to be able to isolate a problem plugin or plugins through experimentation. This normally begins by temporarily deactivating all plugins, verifying that your site does load incredibly fast after doing so (if not, go back to the previous point re: Crap hosting!) and then re-activating each of your plugins one by one – and running performance tests after each plugin is installed to find the point where performance deteriorates significantly. From experience it’s not always a sudden dropoff – it’s quite often a staggered dropoff where you may have 5 or 6 plugins which eventually constitute a significant degradation in performance.
In an ideal, simpler world every WordPress plugin would come with the equivalent of a calorie count which would let users know the implications for installing and using a plugin. But things aren’t that simple and performance criteria is somewhat subjective so in the meantime you gotta learn by doing experiments and tests the effects each of your plugins have on the speed of your website.
Why having a lot of plugins installed can be a bad thing?
Believe it or not, this isn’t a contradictory position to the point we made a few moments ago when we talked about 1 heavy plugin vs. lots of light plugins. Having lots of plugins installed on a WordPress website makes troubleshooting performance issues much much harder. Each WordPress website has it’s own unique cocktail of plugins. I recently worked on a WordPress website with over 80 plugins installed which were considered “must have”. After days of experimentation it turned out 2 of them had their own session implementations which were bringing the server to it’s knees. Because there were 80 plugins you can imagine the fun we had trying to uncover which plugin(s) were causing the issues. Once we replaced those 2 plugins, performance was almost identical to when there were no plugins active. So if you frequently install WordPress plugins and don’t deactivate plugins you’re no longer using and/or plugins that are no longer maintained – you’re compounding the issue and building a nice little problem for yourself down the line. If a lot of the plugins you have installed are frontend heavy and are adding their own Javascript and css files to the frontend then this won’t help frontend performance optimization.
Of course you should also just watch out for shitty plugins in general. That becomes easier the more you use WordPress and develop your spidey sense for shitty plugins. In the meantime, ensure you learn how to evaluate WordPress plugins.
Poorly written WordPress themes
This is where people often start with troubleshooting WordPress performance issues – and in my experience the first 2 issues are usually where most of the issues lie (Hosting and Plugins) – not Themes. I think it’s gotten to the point in 2016 where a lot of WordPress themes are actually quite well put together. Review standards at the major sources of themes such as themeforest and the WordPress.org Theme repository have significantly improved and focus on ensuring that WordPress coding standards are adhered to. While these reviews don’t explicitly cover performance testing they do at least ensure that theme authors are using existing WordPress API calls and functions where possible which helps to reduce overall performance bottlenecks which have been an issue in the past. While things have gotten much better from an overall quality perspective, more can still be done to encourage theme authors to focus on performance. Areas I quite often see theme authors fall down on from a performance perspective include:
- Not looking at the overall page weight – there’s no point in optimizing and minifying your 500kb css file to 50kb if you’re loading a 7MB video on your homepage! It’s quite fashionable for homepages to include short, videos in loops in sliders right now. While they may look lovely, these are your mortal enemy from a performance perspective. Kill them with fire right away. (Sidebar: they’re also not great from a conversion perspective either, performance concerns aside).
- Polluting the DOM with too much bad Javascript – while Javascript may be in the process of consuming WordPress, this doesn’t grant theme authors license to bring our browsers to a standstill. Some theme authors will adopt heavy Javascript libraries for adding animations and transitions to page elements which can cause machine fans everywhere to start whirring to stop your CPU or GPU from exploding. Don’t do this.
- Too much “stuff” – c’mon Ed – surely you can do better than “stuff”! No I can’t. Stuff can be everything and anything. Too many css files. Too much CSS in 1 css file. Too many images. Too much HTML. Too many individual js files. Too much js in too many js files. Generally this comes down to a lack of awareness or caring about the implications of all this “stuff” on it’s implications for performance. Some of the most aesthetically beautiful and popular WordPress themes in existence today are also some of the most bloated, obese themes in existence under their shiny surface. As some WordPress themes start to become popular, the theme author can get inundated with feature requests. As they add more and more features to their themes their doing more and more damage to the performance of their themes. This causes other theme authors to try and match their feature bloat which has led to a whole slew of multi-purpose themes that can basically do anything – which customers absolutely love when buying a theme. It’s only when they go and check the load time of their website that they then discover how slow their website is and then wonder why that is. You can’t have it both ways. You can’t have a super fast website and all your “stuff” – something has to give. In this case it’s your website speed. Decide which is more important – speed or stuff. I choose speed – and so do your customers. I believe that theme authors are getting much better at understanding that all this “stuff” comes at a price and in general things are improving.
Web pages with too much crap on them
So far we’ve tackled Hosting Providers, Plugin Developers and Theme Authors so far as being part of the problem for slow websites. Now dear WordPress Website Owner – it’s your turn! You don’t escape our wrath 🙂
Sometimes it’s no one else’s fault that your website is slow but your own!
I’ve seen some WordPress websites that have webpages that are simply ridiculous. Row after row after row of sliders, carousels, spinners, counters. Video backgrounds. Fucking Video backgrounds! and animated backgrounds. All on one page!
Please stop it – stop it now!
Don’t get me wrong – sometimes we take WordPress for granted. WordPress is truly amazing. It has largely succeeding in it’s goal of democratizing publishing on the web. It’s those fundamental principles of freedom and open source that have allowed such a vibrant ecosystem to develop around WordPress. But as more and more website owners take control of their websites via WordPress (which is great!), the quality of webpages have deteriorated significantly (which is bad – very bad). This isn’t a WordPress problem per se. But, as the software underpinning over a quarter of the web, I feel it is something that the WordPress community can do a hell of a lot more to inform and educate website owners of the consequences of creating shitty web pages. Medium for example does an excellent job at steering people to create content rich, engaging web pages that are not full of crap. Of course it’s easier for big centralized, closed source platforms like Medium as they exert a lot of control and constraints over how content publishing works. WordPress in many ways is the opposite of Medium – an open source platform where anything is possible. Just because anything is possible doesn’t mean we should do everything!
We’ve given people the keys to the most powerful publishing software ever created but not shown them how to drive them damn thing properly.
The first victim here is website owner themselves. An experienced web designer or content manager would have told them not to create overloaded webpage as it will hurt their websites performance in search engines (because – for example – their overloaded webpage with spinning videos, sliders and counters take 60 seconds to load!). Someone new to WordPress might not figure this out until they’ve already damaged their ranking. Some plugins like Yoast SEO do a reasonable job at guiding users on ensuring their content is optimized for search engines – but I think publishing tools in WordPress can be significantly improved to help website owners create webpages that perform well not just for search engines – but for humans in general! And that starts with ensuring pages load fast – which means not overloading pages with too much crap.
How to speed up WordPress – It’s time to cut back and get lean
You can buy the most powerful dedicated server. You can design an ultra minimal fast loading theme. None of that matters if you pollute your web pages with tons of crap, slow loading “stuff”. Hell, even sites that should know better are now forgetting the hard learned lessons of web publishing and are starting to destroy their user experiences with constant popups, doormats, page takeovers and so on. The pressure to make a buck is endangering the golden goose again.

So what are we to do? It’s time to get lean and start cutting back on the amount of bells and whistles we add to web pages and put the focus back on creating great content. From a website owners perspective, this is the single most important task you have direct control over in terms of improving the load speed of your website.
Setting a website performance budget
From a website owners perspective I believe every website owner should have a Website Performance Budget which they should be fully aware of and how it impacts their website both from all aspects of the website operations lifecycle; from initial Planning, Design, Development and ongoing management. The ins and outs of Performance budgeting is a bit beyond the scope of this post but for anyone interested I would suggest this Website performance post series on Smashing Magazine.
How do we measure performance? Choosing Key Performance Indicators (KPI’s).
What about page size?
The most obvious starting point would be to set out a budget for the total size of a webpage. And this is a good idea. But webpages have become very complex beasts. Quite often webpages may only have a small html document but end up taking a few minutes to load when they incorporate asynchronous javascript calls. This makes it difficult to set out guidelines against – short of – load as few things as small and those things you do need to load – keep them as small as possible. But that’s not really going to help us set proper, measurable guidelines.
What about page load time?
Page load time is a bit better. It’s much easier to be more specific. We could simply state something like “All pages should load in less than 2 seconds“. And again, this as a general rule is not a bad concept. There’s tons of tools to help us do that easily like the Pingdom Website Speed Test and the WebPageTest performance test tool – both of which are free. But again, the modern web is becoming quite complex. Initial page load times no longer fairly reflect what happens when a user sits in front of a screen. So while we will indeed pay close attention to page load time it won’t be our only key performance indicator. Read more here why.
What about Google PageSpeed Insights?
Finally we get around to talking about Google PageSpeed 🙂 PageSpeed Insights is tempting because it takes a very complex topic like website performance and condenses it down to a single percentage score. We humans like that kind of thing! Also, it’s coming from the great speed junkies themselves – Google! Surely this should be the only key performance indicator we should care about? Not quite. But hang on Ed this entire blog post is about achieving a perfect 100/100 PageSpeed score – you lied to me! Hang fire there a second – we’ll get to the perfect 100/100 very shortly I promise. We just need to be clear that before we get there – it’s by no means the most important part of how you measure your websites performance. Some say you shouldn’t care about it all. While we couldn’t quite go that far, the guys over at WP Rocket make a very important point in the linked post. PageSpeed Insights doesn’t actually measure the speed of your website. And clearly, speed is incredibly important and central to this whole post.
So why try and achieve 100/100 PageSpeed Insights at all?
Well, firstly, it’s a challenge to see just what it takes to obtain a perfect 100/100 PageSpeed score.
Second, lots of people focus on PageSpeed Insights and ask questions about to how to achieve the holy grail of a perfect 100/100 over and over again. By tackling this topic within the context of a ton of other useful goodies about performance optimization I’m hoping you get a better understanding of performance optimization in general and a full appreciation of what is and what isn’t important.
Our final selection of Key Performance Indicators (KPI’s)
So before we get on with optimizing the crap out of our WordPress install, let’s settle on a few benchmarks for our Performance optimization tests. Rather than use just one Key Performance Indicator (KPI), we’re going to use 3.
- Page load time
- PageSpeed Insights Score
- WPT Speed Index
We’ve touched on the pros and cons of the first 2 already. The WPT Speed Index isn’t something we’ve touched on before but it’s becoming an increasingly common KPI to use when measuring website performance as it’s more meaningful than just the page load time as it incorporate how long page render time too. So let’s get on with it. Our target for each KPI is as follows:
- Page load time: Less than 1.5 seconds – We’ll use Pingdom’s New York City test origin for all tests to measure page load time. Note: Our server is located in Siteground’s Amsterdam data centre in Europe so there’ll be some network latency built into our tests as a result. This is by design and will ensure we’re optimizing for scenarios where customers are based around the world.
- PageSpeed Insights Score: 100/100
- WPT Speed Index – Less than 1500
Why these values? The PageSpeed one is kinda implied from the post title 🙂 The other 2 are numbers that I feel are pretty challenging for a lot of WordPress and WooCommerce websites – but are achievable. Put it this way – if every WordPress website on the web loaded in 1.5 – 2 seconds then the web would be a much faster and better place for it. As you’ll soon see – there’s no reason why that is not the case. Onwards and upwards with the tests!
How to Speed Up WordPress and have a blisteringly fast WordPress and WooCommerce website – Step by Step
So now we’ve set out our stall for some fundamental WordPress performance optimization principles – let’s turn the theory into practice and show you how it’s done!
Step 1: Get yourself a fast WordPress host
Ditch that crap, cheap kitchen sink host and get yourself over to Siteground now. Get the Go Geek plan so you can avail of all 3 levels of the Siteground Supercacher which will be vital to our journey to 100/100 on PageSpeed Insights. If you don’t want to switch to Siteground for whatever reason you can still proceed with the rest of this tutorial but don’t come complaining to me that you’re not hitting 100/100 later on! There are other ways of emulating what the Siteground Supercacher does – but they require in depth technical expertise of how to run web and caching servers beyond the scope of this tutorial – so save yourself the hassle and get yourself onto a decent host right now. We’ve covered the Siteground signup process in detail in Part 1 of our how to start a blog series.
Step 2: Install WordPress
If you’ve never installed WordPress before on Siteground it’s really straightforward. This video covers both the Siteground signup process and how to setup WordPress via the Siteground WordPress installer.
Step 3: Install Demo Content
There’s no point in performance testing an empty shell of a website. Let’s import some demo WordPress content to ensure the test reflects your average WordPress website. The WordPress Theme Unit Test data set is as good as any. Let’s go ahead and follow their instructions and import the theme unit test data.
- Download (Right Click – > Save as) test data: https://wpcom-themes.svn.automattic.com/demo/theme-unit-test-data.xml
- Import test data into your WordPress install by going to Tools => Import => WordPress*
- Select the XML file from your computer
- Click on “Upload file and import”.
- Under “Import Attachments,” check the “Download and import file attachments” box and click submit.
NOTE: You may be prompted at this point to install the WordPress Importer at this point if this is a brand new WordPress install. You may see this:
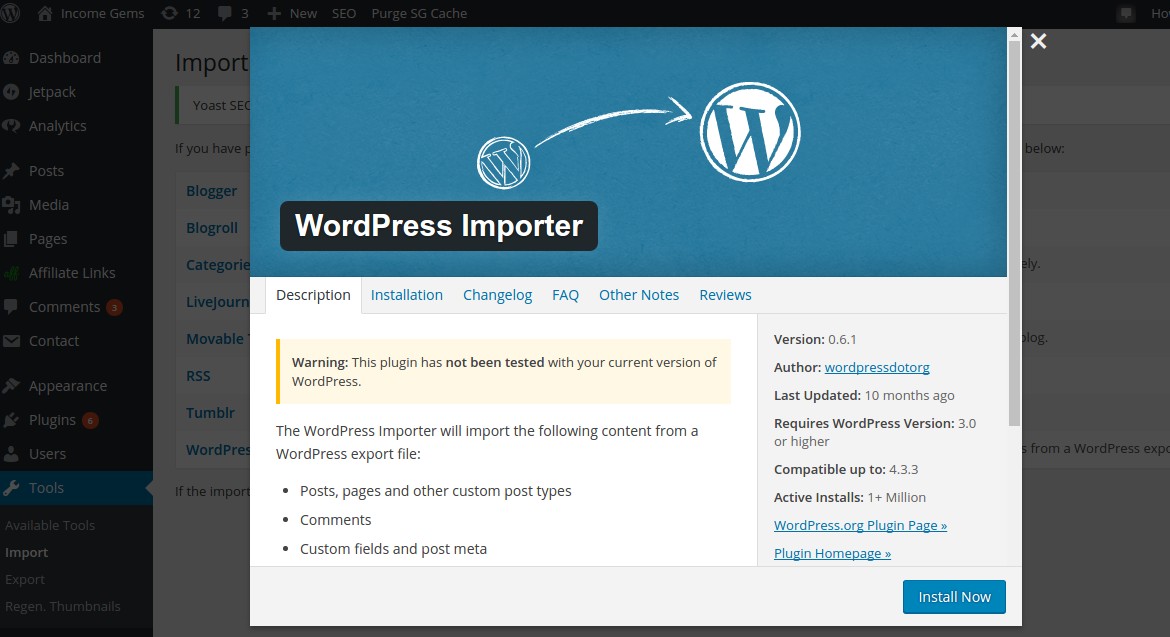
Go ahead and install and activate this plugin to complete the demo content import process.
During the import process, make sure you select to Download and import file attachments.

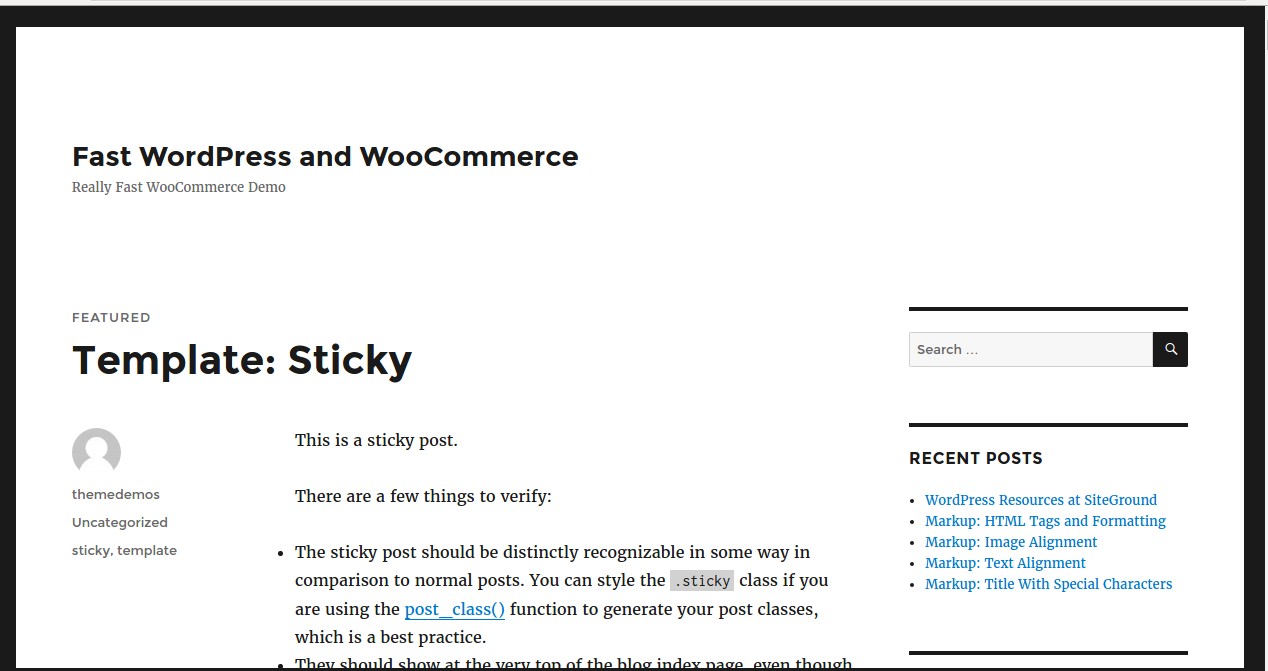
Once this task is complete you should see an “All done. Have Fun!” message.
At this point you’ve got your initial WordPress install complete and loaded with some demo data which should look a bit like this.
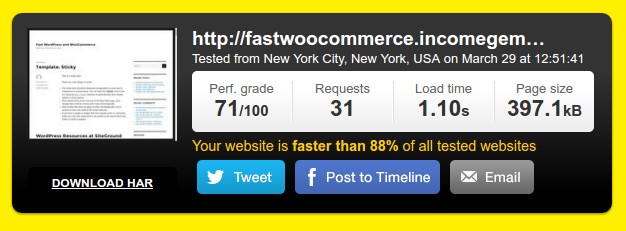
So let’s run some initial benchmark tests of our KPI’s and see how we’re doing out of the box.
Load Time

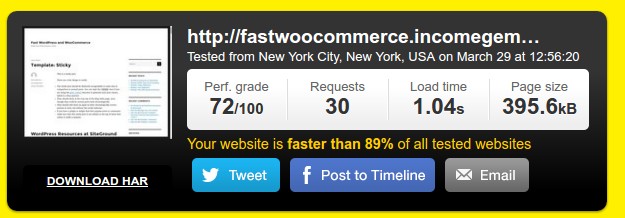
Not great eh? One thing you’ll notice the more you use tools like Pingdom, PageSpeed Insights etc. is that you’ll rarely get the same results in 2 different tests. After running the test above I ran the exact same test again and got the following.
Woah – nearly a full 2 seconds faster! What’s going on here? It could be any number of things. Perhaps some caching is occurring on Pingdoms network. While we’ve not yet enabled any caching layers on our Siteground account perhaps there is some network caching occurring to speed up repeat connections from Pingdom’s NYC location. I ran the test again a few minutes later and got an even better load time.
In summary, load time will always have uncontrollable variables such as network latency. For this reason you should always run your tests at least 3 times (and ideally 5 or 6 times) and you’ll be able to get a better sense of what your true load speed is. From this point on I’ll be showing the average load time I achieved based on 5/6 individual tests. The same methodology will apply for Google PageSpeed Insights and WPT Speed Index.
A Page speed of just over 1 second isn’t too shabby a start at all! That’s the value a decent host provides out of the box.
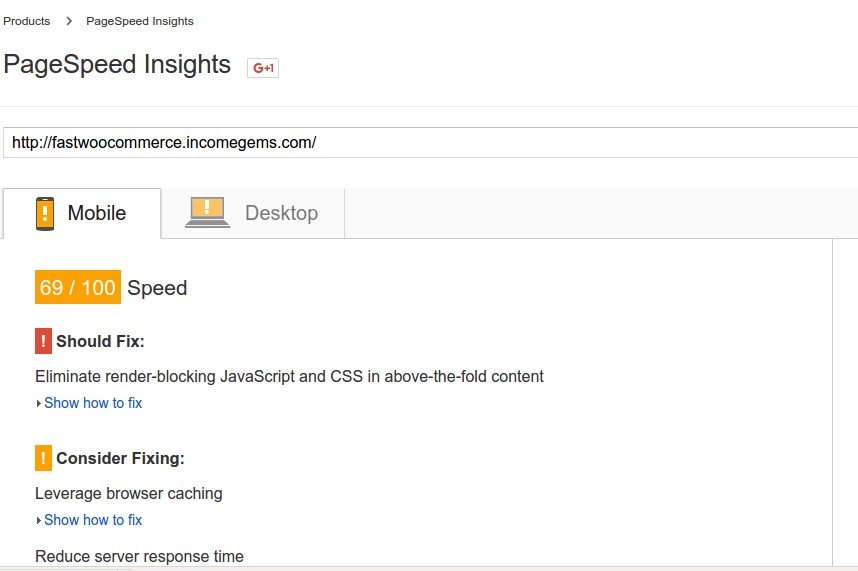
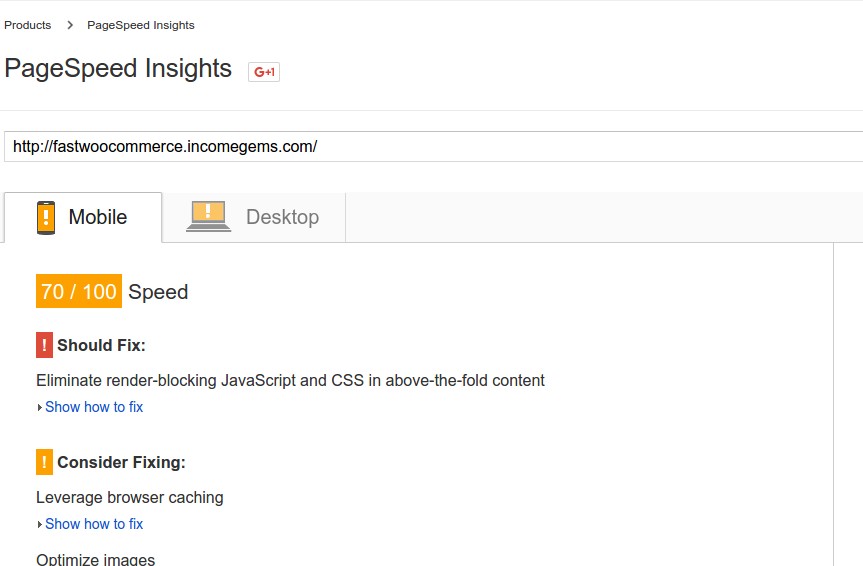
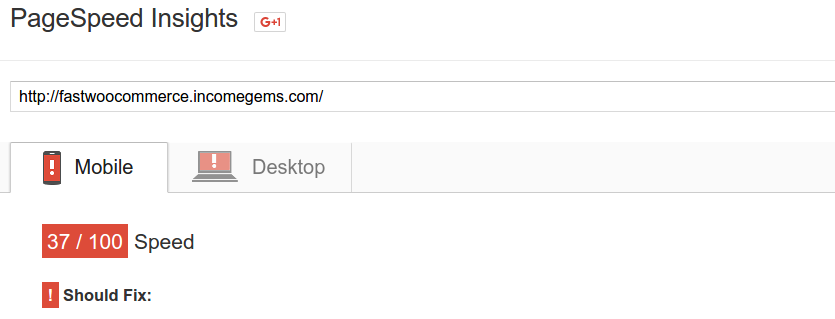
Google PageSpeed Insights
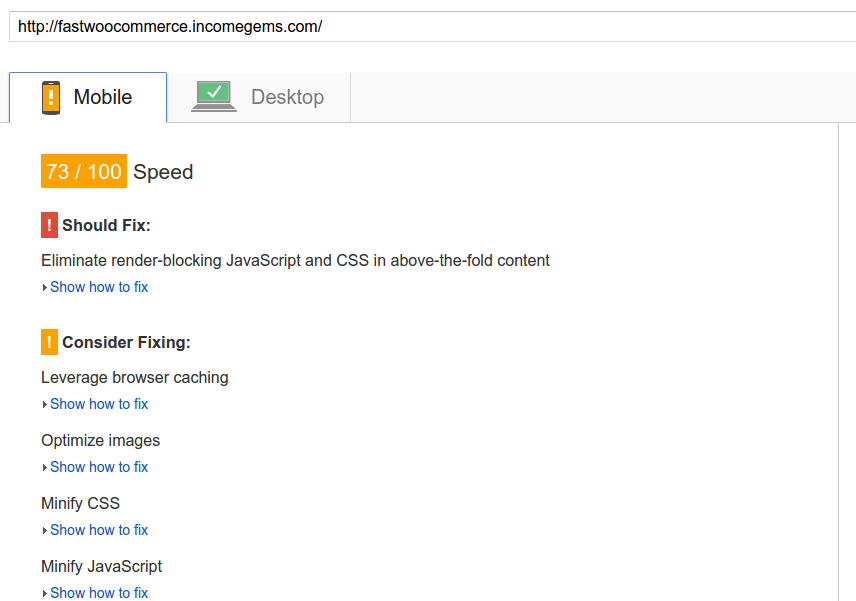
Mobile
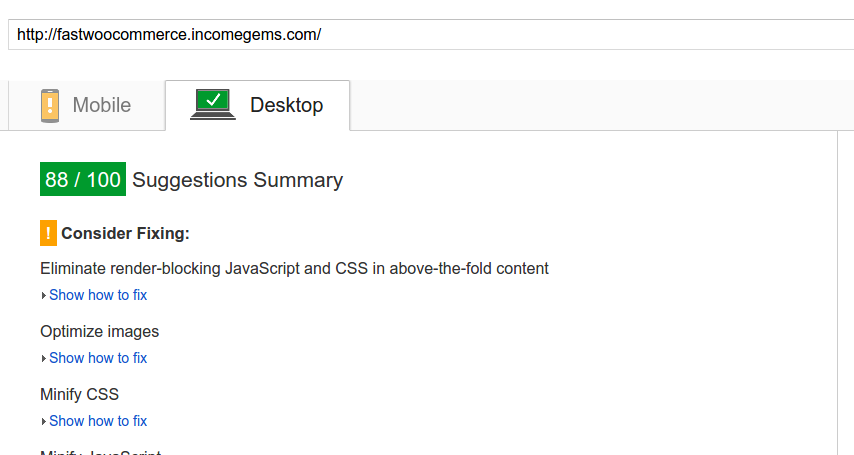
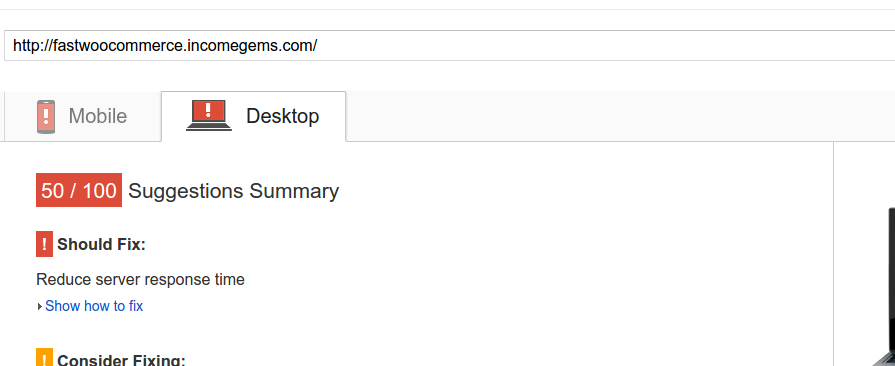
Desktop
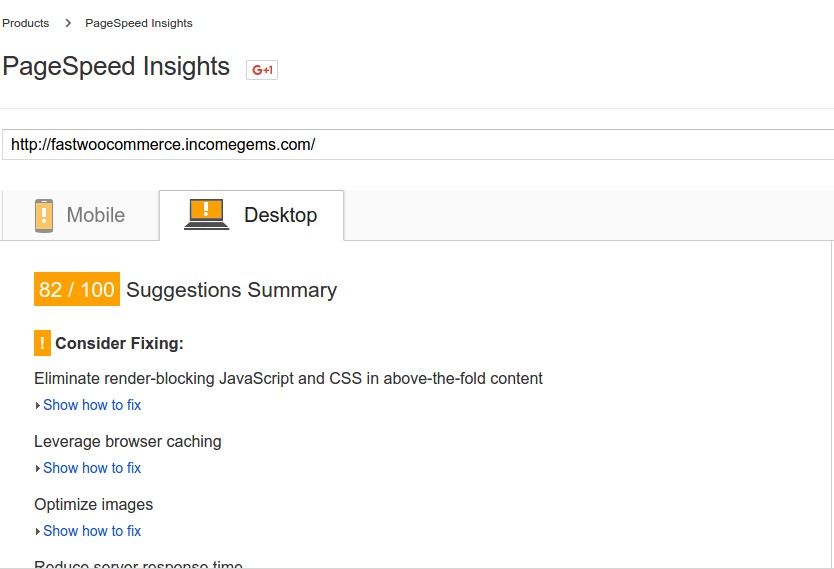
Ok that’s not actually that bad without doing any kind of PageSpeed specific optimization.
WPT Speed Index

Our WPT Speed Index is at 2561 for the First View and 2098 for the Repeat View. That’s a little too high for my liking and well off our target of 1500.
Let’s get to work on some optimizations.
Step 4: Enable all the caches!
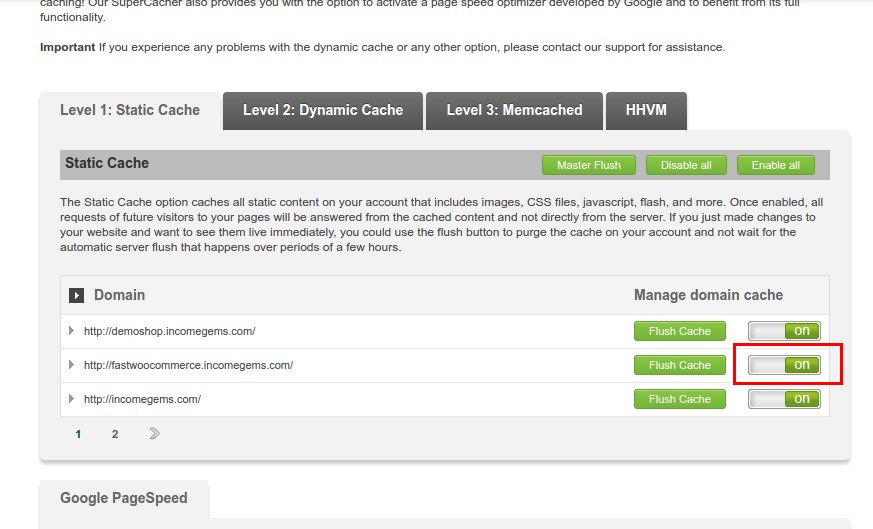
This is where Siteground really shines. Log into your Control Panel (CPanel) and head to the SuperCacher.
Enable Level 1: Static cache
If you installed WordPress via the Siteground installer chances are this is already enabled for you.
It should look like this:
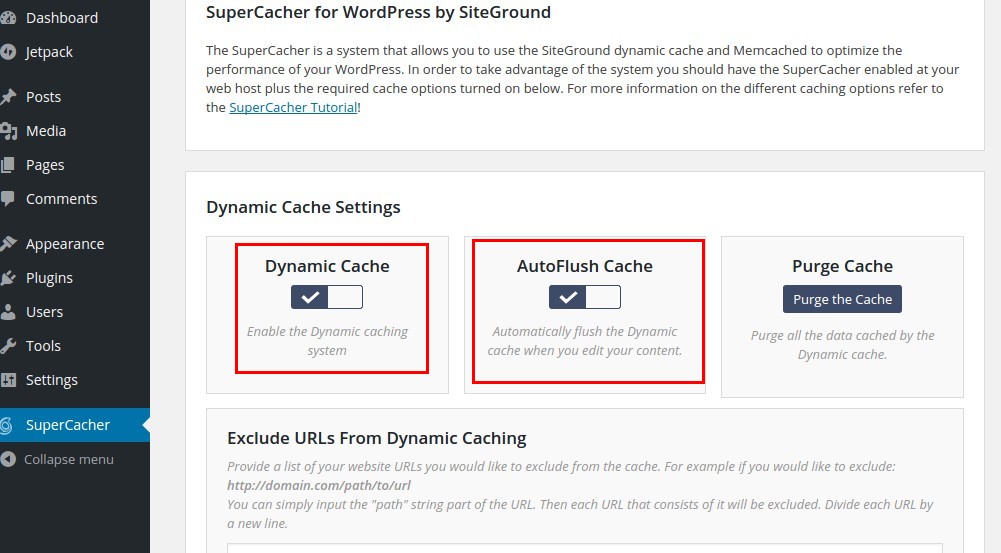
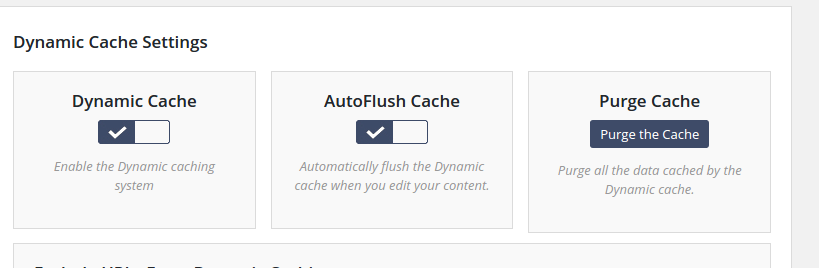
Enable Level 2: Dynamic cache
Before you can enable Level 2: Dynamic Cache you need to install the SG CachePress plugin. Again, if you followed our tutorial earlier this is already installed. If not, you can grab and install the plugin from the .org repo.
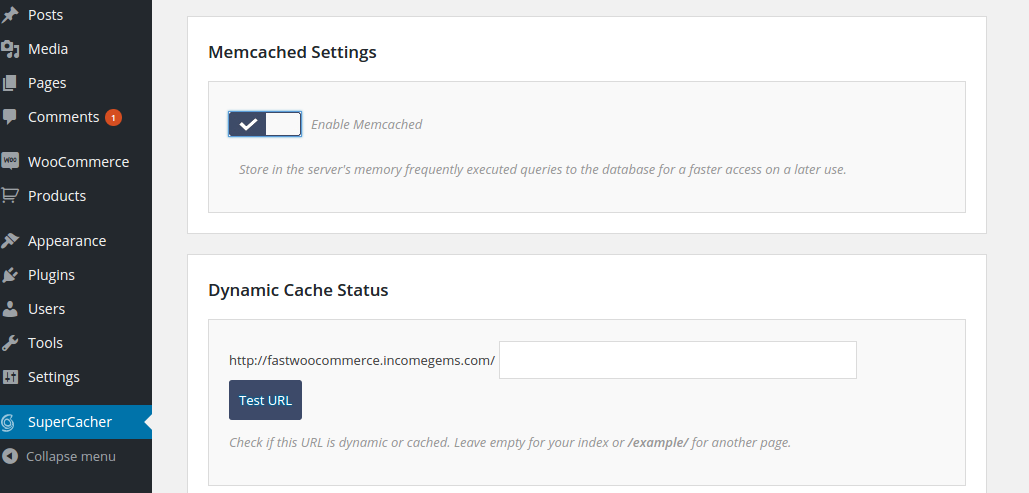
In WordPress, then go to SuperCacher and ensure dynamic cache is switched on and set to auto purge.
Then head back over to cpanel and switch on Level 2: Dynamic cache.

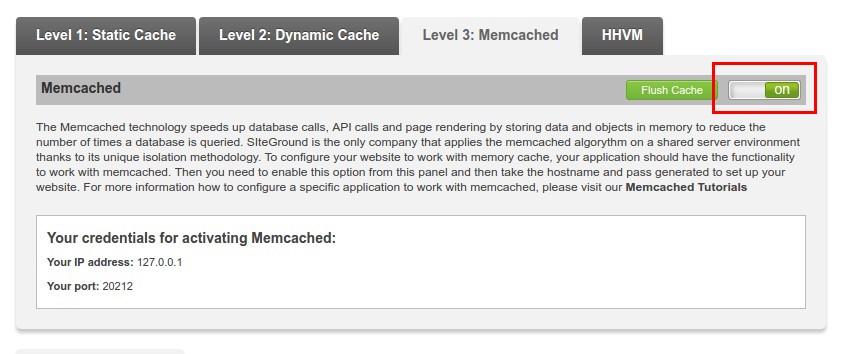
Enable Level 3: Memcached
Again, this won’t work unless you’ve got SuperCacher installed and activated.
You then need to ensure it’s switched on in the Siteground SuperCache control panel.
You can verify your Level 2 caches are working by going to your website frontend in an incognito window (caches are bypassed for logged in users) and opening the Developer Console in Chrome and observing that the page has been served from cache as follows.
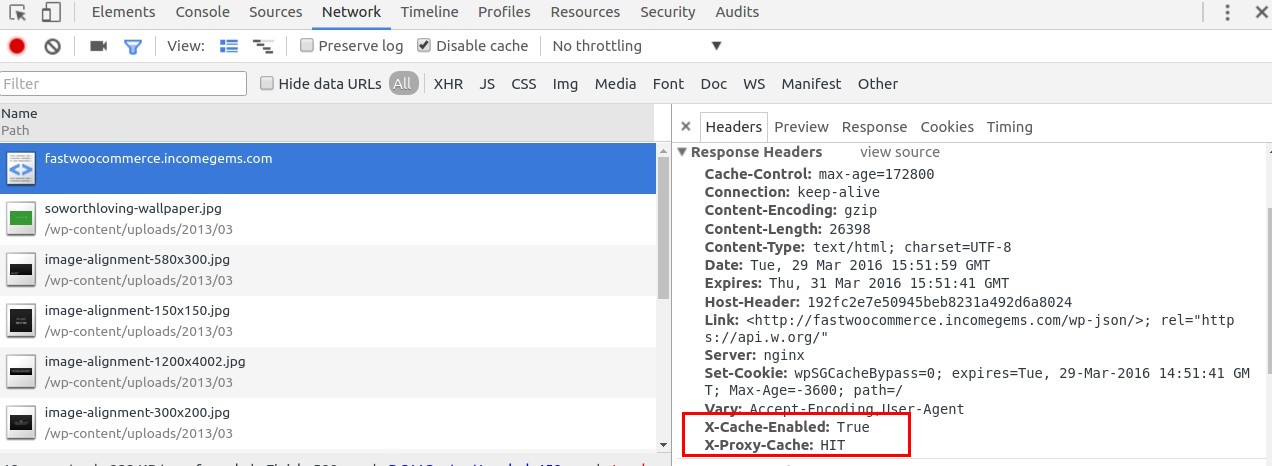
The first time you load your page you will probably see X-Proxy-Cache: MISS. This is normal. Once you refresh the page you should see X-Proxy-Cache: HIT as per the screenshot. If you see X-Proxy-Cache: BYPASS this either means you didn’t open your site in an incognito window or else you’ve got some other session/cookie that is making the Siteground cache service decide to not cache your request. (e.g. An active WooCommerce cart session for example).
Let’s re-run our KPI tests and see how we’re doing.
Load Time

Again that’s an average of 4 or 5 tests to ensure it’s not an outlier result.
Simply enabling all Siteground caches has reduced our average load time by approx 25%!
It should also be noted at this point that most of the savings in load time have been achieved thanks to the Level 2: Dynamic cache. The dynamic cache means that the content of the page is being served from in an memory cache meaning the php runtime doesn’t even see this page request – which makes it very very fast to generate the HTML for the page.
Google PageSpeed Insights
Mobile
Desktop
Some minor improvements in our mobile score and no change in our desktop score. This underpins that PageSpeed Insights don’t really take into consideration the significant improvements in load time we’ve just achieved!
WPT Speed Index
Very minor improvements to our Speed Index here. Let’s keep going!
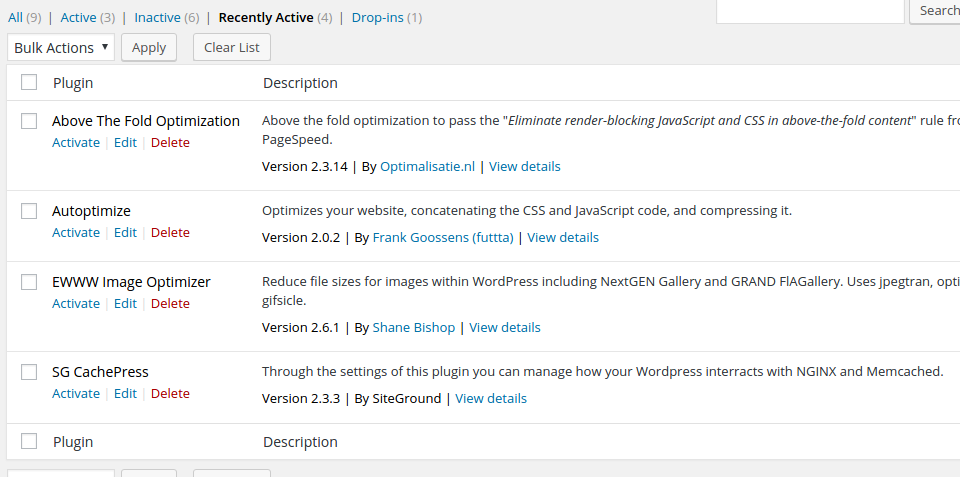
Step 5: Implement PageSpeed Optimizations
Let’s tackle the things that PageSpeed wants us to take a look at one by one:
- Eliminate render-blocking JavaScript and CSS in above-the-fold content
- Leverage browser caching
- Optimize images
- Reduce server response time
- Minify CSS
- Minify JavaScript
Thankfully -Most of these can be tackled via a series of free WordPress plugins – let’s go.
Eliminate render-blocking JavaScript and CSS in above-the-fold content
To do that we install and configure the Above the fold plugin. This plugin is specifically designed to resolve this PageSpeed issue. A word of warning! Eliminating render-blocking Javascript in WordPress is not for the faint of heart. Many themes and plugins actually need their Javascript to execute in the header to work properly. In moving those calls to the footer (which is essentially what the plugin does) you may actually break your website. For that reason you’ll need to experiment and tweak the plugin settings accordingly depending on what plugins and theme you’re using. The plugin is actually quite powerful and can be used to create quite sophisticated CSS and JS loading strategies. For now, we’ll keep things simple and use the plugins default settings (i.e. don’t change anything!).
Leverage browser caching
There are lots of ways to deal with this but my preferred method is to use custom .htaccess rules as follows.
Add that AFTER any existing .htaccess directives you already have such as the default .htaccess rules for WordPress url rewrite rules for example.
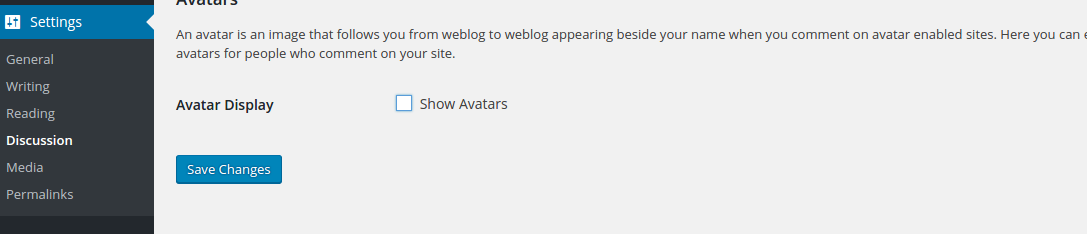
Switching off Gravatars
PageSpeed will complain about the Avatars that WordPress displays by default which are served via gravatar.com and for which there are no asset caching rules defined. For now, let’s switch them off in Settings -> Discussion.
Just before we re-test let’s hit the “Purge the Cache” button to ensure PageSpeed see’s the latest directives we’ve added.
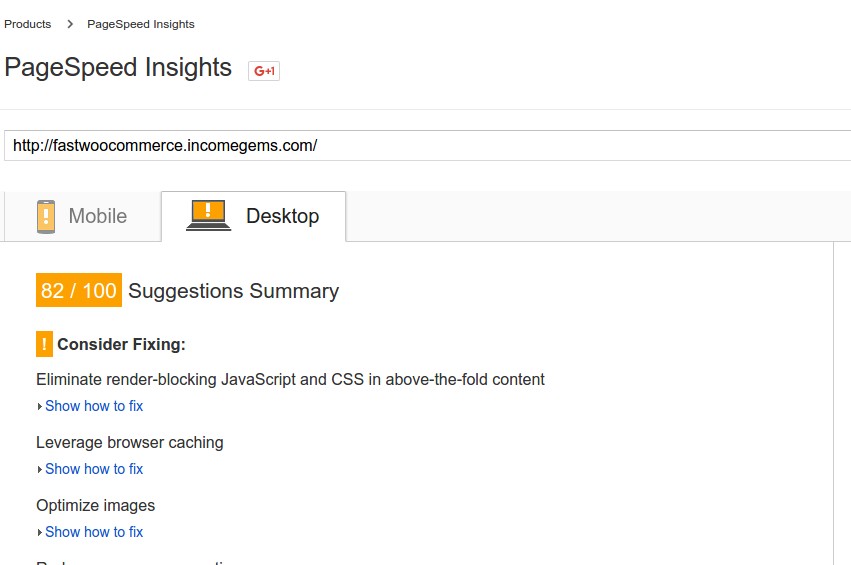
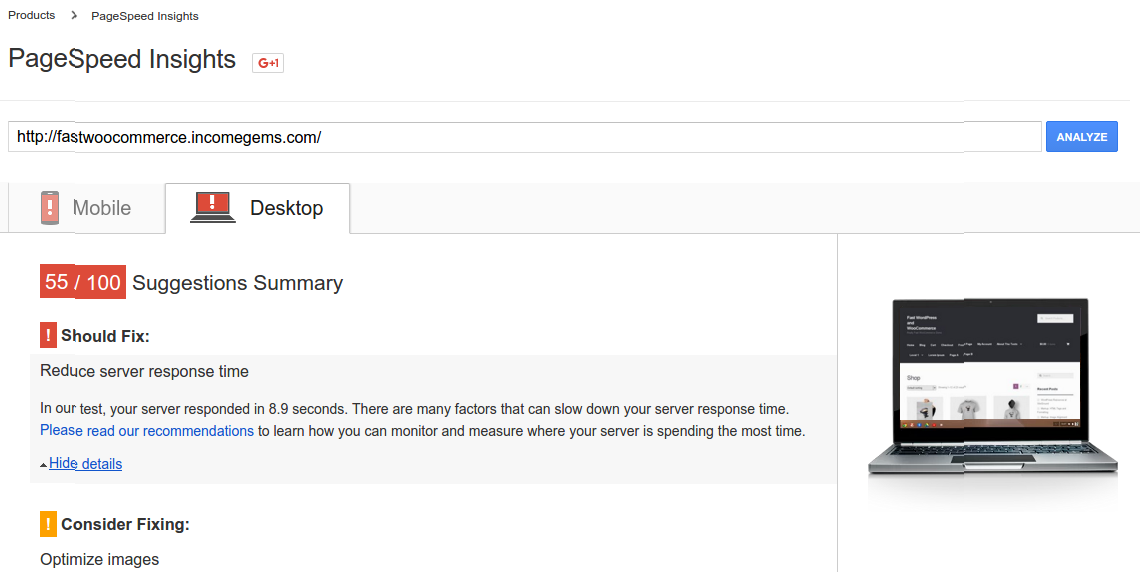
These few pages bring our PageSpeed up to 73/100 for Mobile and 88/100 for Desktop
Note: We’re not re-testing page load speed or the Speed Index at present as the changes we’re making focus solely on our PageSpeed score right now. We’ll circle back to load speed very shortly – I promise 🙂 Another small point to note is that PageSpeed caches your results for 30 seconds – so if you’re making lots of minor tweaks to your site you still have to wait more than 30 seconds before re-running PageSpeed.
You’ll notice we’re still seeing notices about render blocking and CSS minification. Let’s deal with those now.
Minify CSS and fully resolving render blocking issues
To address both of these we install and configure the awesome Autoptimize plugin. After experimenting with lots of settings with this plugin, this is what I’ve settled on for best results.
Key changes here from the defaults are to uncheck “Force Javascript in <head>” and checking “Inline all CSS”. We also check “Optimize HTML Code”.
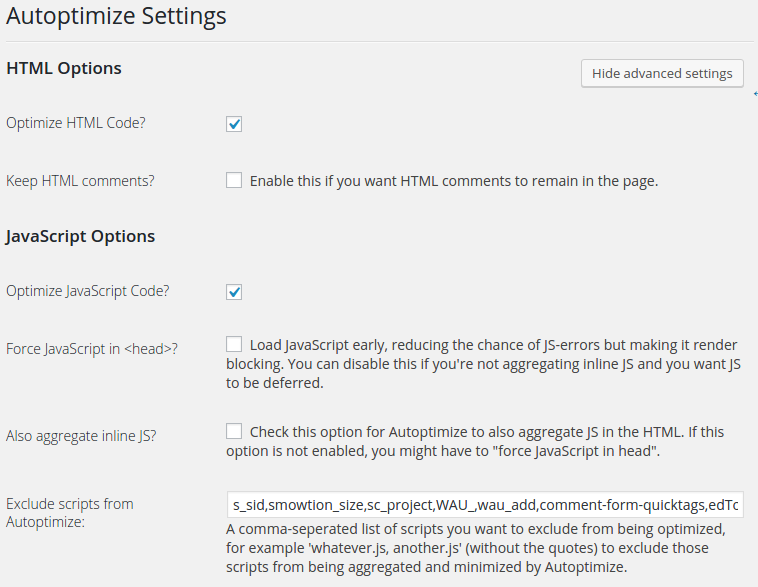
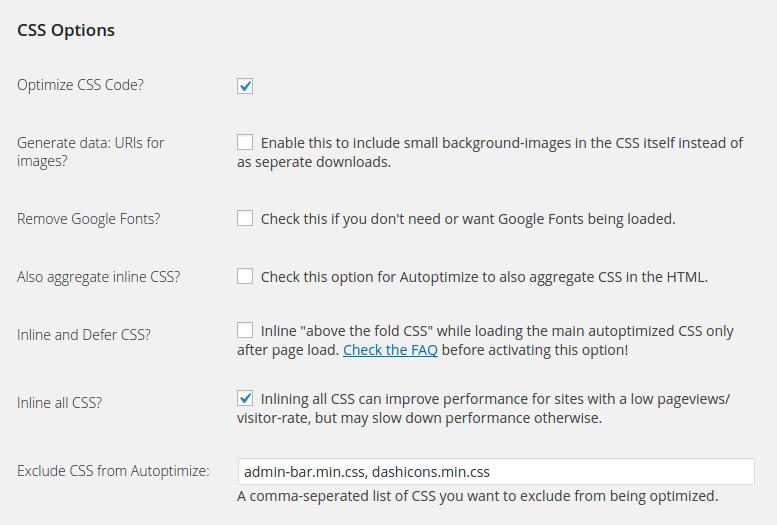
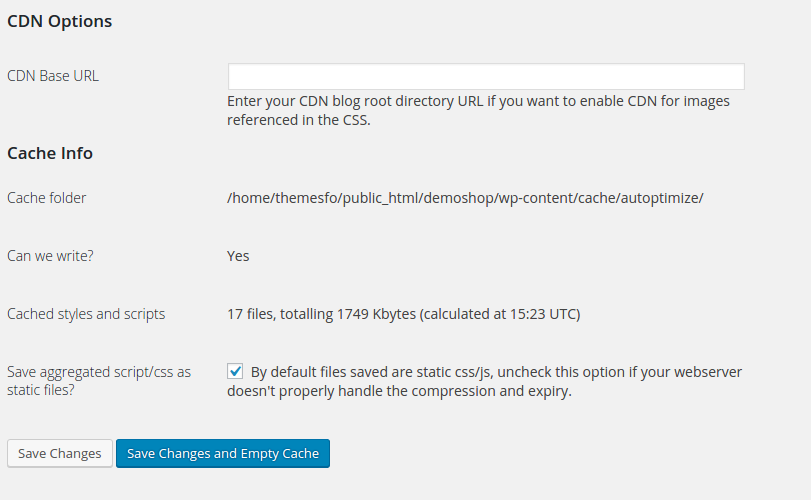
Wait a second Ed, inlining ALL CSS – surely you can’t be serious?? Yes I am. At first glance this might sound daft. In some sites with huge CSS files – it IS daft. But here’s the point. Your css file SHOULDN’T be huge. We’re focusing on performance here remember. Inlining all your css actually speeds up the first render as CSS is no longer a blocking request. Of course there’s a smarter way of doing this. Simply inline just the css required for the initial rendering of the page structure and main content elements. But this will usually require advanced CSS/design skills – and even then it will require lots of trial and error to get just right. If you’re overall CSS payload is relatively small, inlining the whole damn thing doesn’t add too much additional weight to each page request and makes things much much simpler.
Now you’ll see we’ve nearly eradicated the PageSpeed render blocking warning.
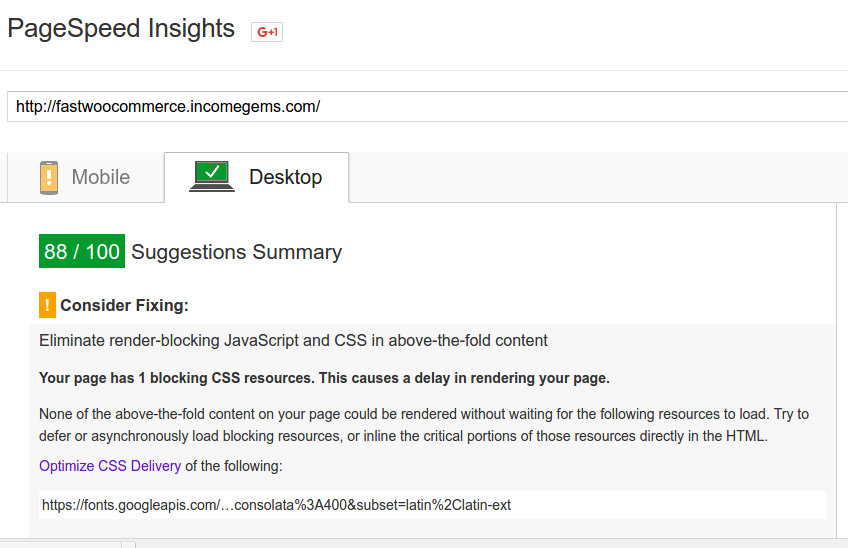
We’ve got one last blocking CSS resource – our Google font. Personally I love Google Fonts – but I’ve not found a way of getting to the promised 100/100 land without ditching them. So let’s get rid of them. In fact, this is a good point in the process to introduce WooCommerce and a fast loading WooCommerce theme and configure our homepage. Right now we’re still rocking TwentySixteen and don’t have the overhead of the WooCommerce plugin to worry about – but where’s the fun in that. Let’s mix things up and see what it does to our PageSpeed.
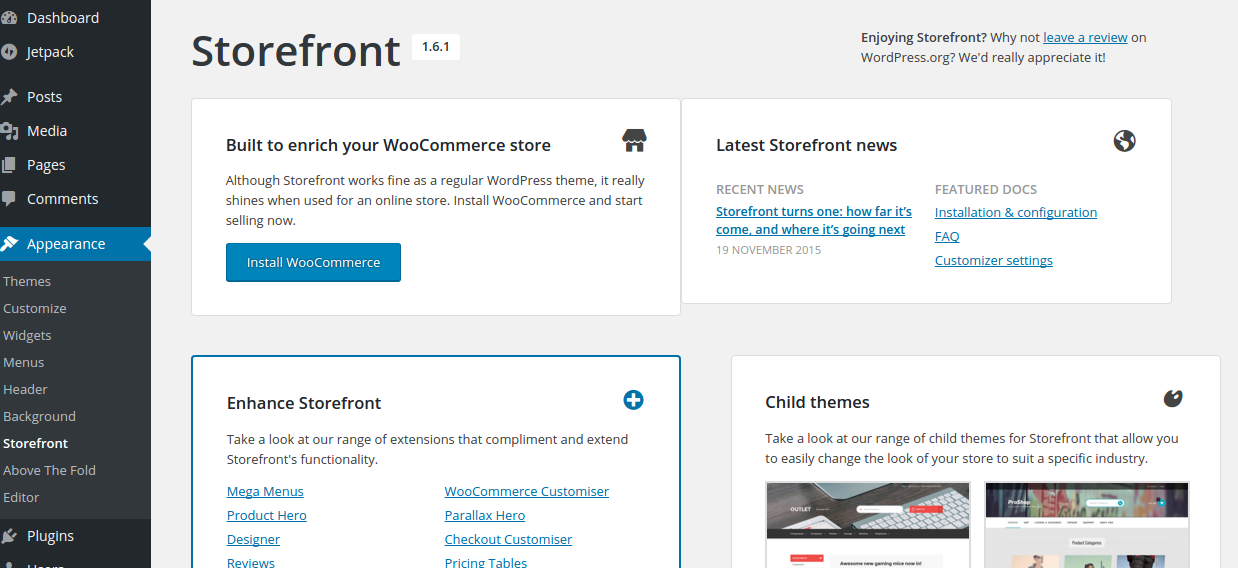
Install WooCommerce and Storefront
Go to Appearance -> Themes and search for “Storefront”

Go ahead and install and activate Storefront and click the “Get started with Storefront” button.

This will bring you the WooCommerce installation process.
Go ahead and install and activate WooCommerce – it’s a pretty straightforward process. In summary, we’ll choose to install the WooCommerce Pages and all other defaults presented.
Import WooCommerce Demo Data
Once WooCommerce is installed let’s go ahead and import some demo products. This is very similar to how we imported WordPress demo data earlier. WooThemes have a handy guide.
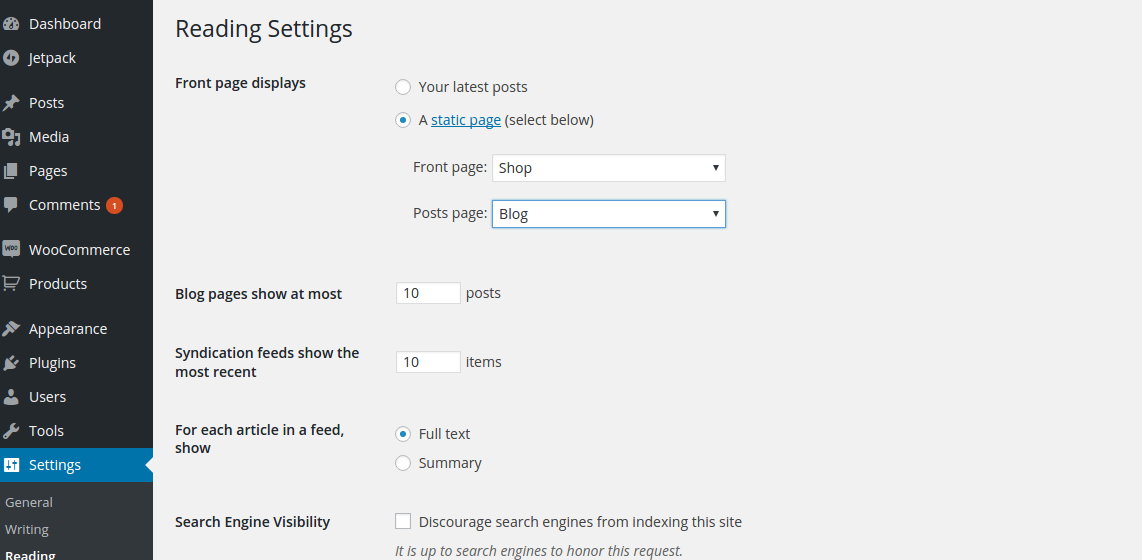
We’ll then go ahead and make the “Shop” page our homepage – which is what any good self respecting shop would have as their homepage 🙂 Go to Settings -> Reading
Let’s clear our SuperCacher cache and then check out PageSpeed again.
Quick sidebar – I ran PageSpeed straight after clearing my SuperCacher cache which meant the PageSpeed request was the request which warmed up my caches (i.e. PageSpeed would have seen a MISS on the cache headers). Want to see what that does to our PageSpeed score?
The initial page load after purging your SuperCacher caches is going to take a lot longer to generate – this is what life is like on most WordPress web hosts by the way 🙂 Let’s give it 30 seconds and re-run the test!
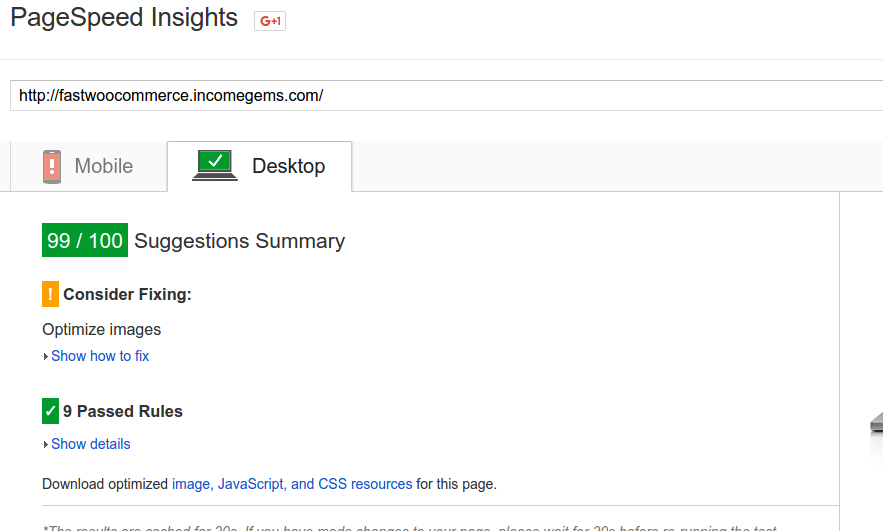
99/100 – so close!
What this also tells us that while minor load time fluctuations on already fast loading pages don’t really influence your PageSpeed score, long load times differentials have a HUGE impact on your PageSpeed. The initial uncached request will also now include the additional load overhead of WooCommerce which would make that differential bigger. Switching to Storefront also has the added benefit of removing the Google font request as Storefront uses Helvetica Neue as it’s default font. We’ve got one more thing we need to fix.
Optimize images
To resolve this issue we’re going to install the tried and tested EWWW Image Optimizer plugin. Once you install the plugin head over to Media -> Bulk Optimize and click “Start optimzing” which will do a once off bulk update to all your existing images. NOTE: If you’ve got a very large WordPress website this can take some time!
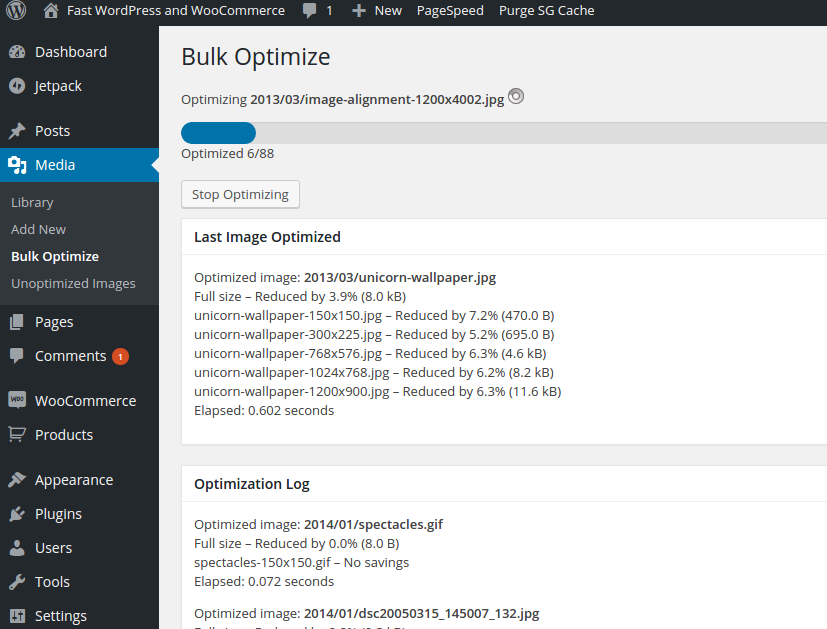
You’ll only need to do 1 bulk update. After that, any new images you add to WordPress or WooCommerce will automatically be optimized by EWWW which is what it makes it such an awesome plugin. You can spend time tweaking it’s compression and optimization settings but I’ve found the defaults to work just fine.
Let’s purge and warm up our caches and head back over to PageSpeed and drumroll …….
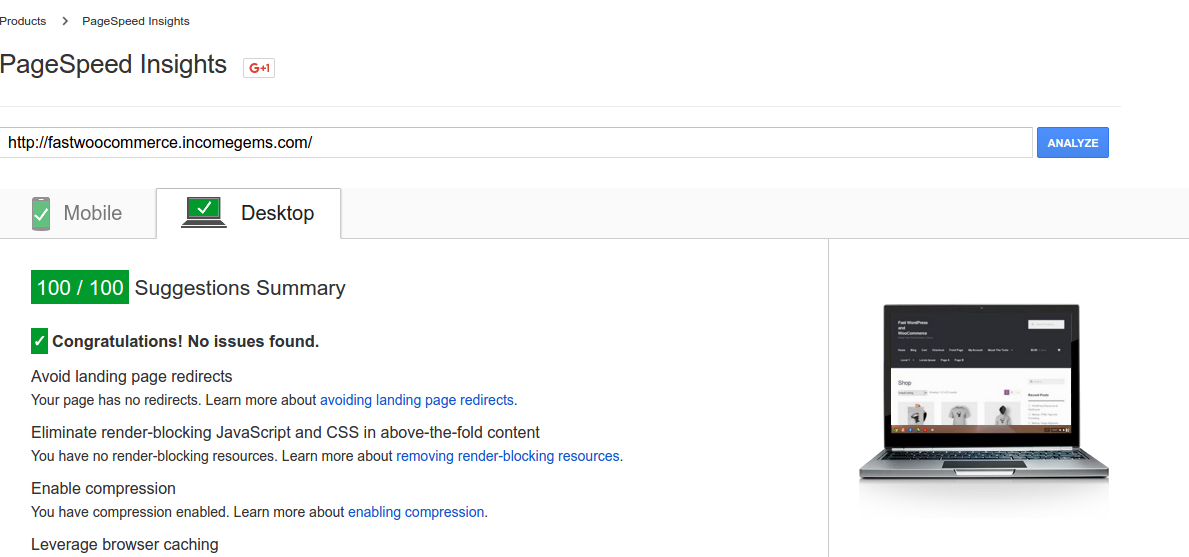
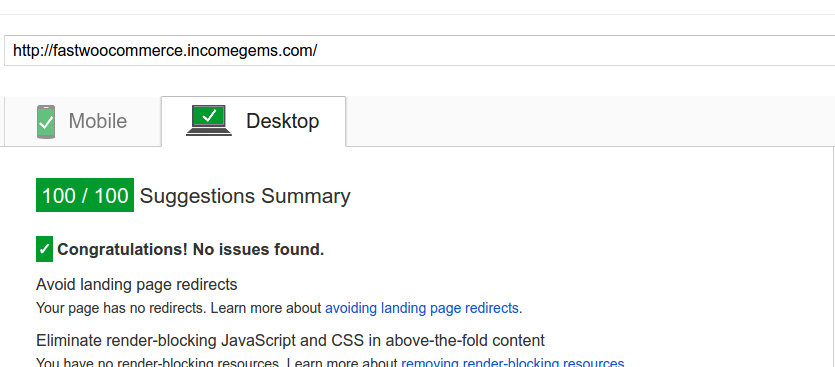
BOOM! 100 / 100 AS PROMISED !!
Don’t be disheartened if you see a 99/100 when you switch over to the mobile tab (heaven forbid!)
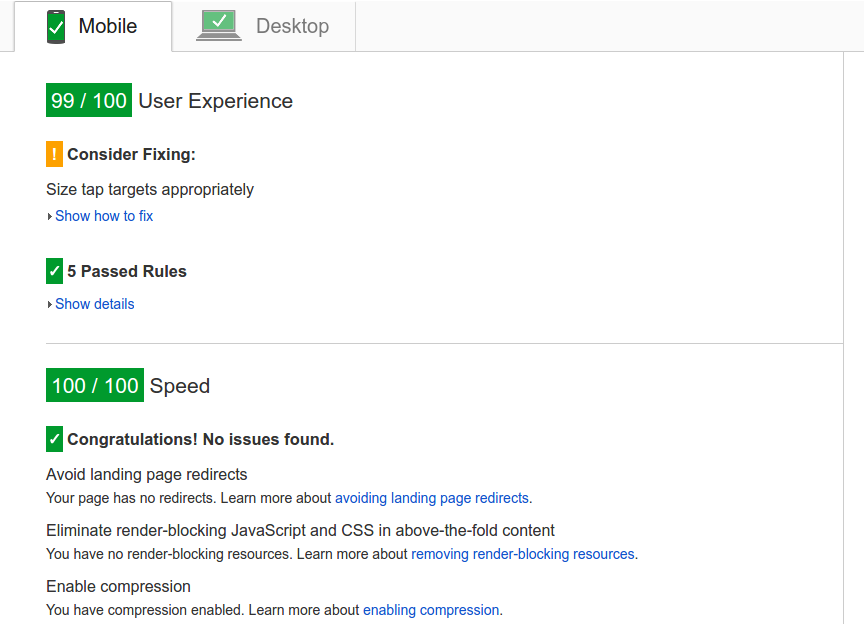
PageSpeed has sneakily put the “User Experience” score above the Speed result – which is 100 / 100 just like our desktop score. Out of interest – the tap target recommendation for the User Experience score is completely subjective if you ask me – the default tap target size in Storefront is perfectly fine as is. Anyway this tutorial is primarily about speed and we’ve achieved what we set out to do! A perfect 100 / 100 PageSpeed Score without the need for an expensive Cloud/VPS or Dedicated machine.
Step 6 – Final check of our other KPI’s
While we’ve specifically focused on achieving a perfect 100 / 100 PageSpeed score in Step 5, we still have 2 other KPI’s that we should now circle back around to and see how these PageSpeed Optimizations have helped (or not as the case may be!).
Load Time

This is now averaging out at approx. 1.2 seconds – which is an increase in our load time. It’s worth remembering though that our homepage is now quite different from when we ran our original load time tests. We’ve a new theme, we’ve some new plugins installed (one of which is heavy – WooCommerce) and our homepage has a lot more images than it did last time around.
In fact, let’s switch off all our performance plugins and our caches and see what the Load time is for our homepage when it’s stripped of it’s superpowers.

While our performance grade only drops from 98/100 to 93/100, our load time goes from 1.29 secs to 11.72 secs!! Woah! And while we’re at it let’s check our PageSpeed again now sans speed enhancements
Holy Moly! Quickly let’s switch everything back on!
And re-active the SuperCacher, warm up the cache and ….
Ahh – that’s better 🙂
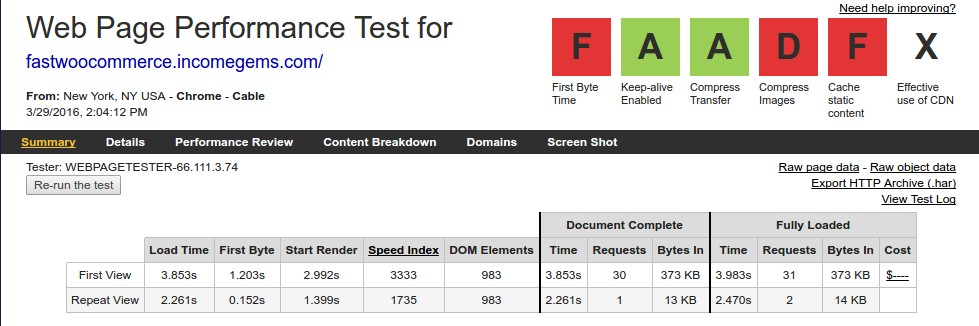
WPT Speed Index
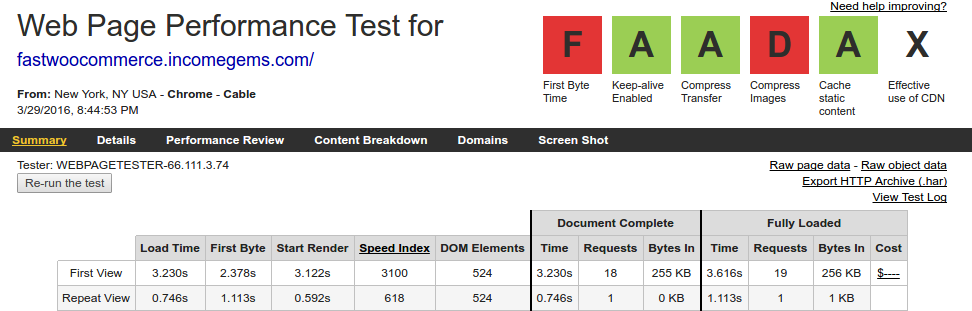
Our Time to First Byte (TTFB) is still pretty high on this test round which forces our Speed Index up to 3100 – not great. The repeat view Speed Index is down now to 618 which I’m very happy with. WPT was overloaded when I was running these tests and I’m confident if I try running the tests at a quieter time that the TTFB will be much lower and the Speed Index will be much closer to 1500 for the First View which will get the First Byte time closer to an A. (Sidebar: What about the D for Compress Images? Basically this could be resolved if we chose to do lossy compression of our images – which is what WPT is looking for) I’m choosing not to do that right now as lossy compression does lead to a drop in quality that is sometimes noticeable. If I was chasing straight A’s on WPT I would do it but I’m not 🙂 EWWW does support lossy jpg optimization if you wish to use it – but does require a paid subscription.
Conclusion
Well sports fans that’s nearly it for this epic WordPress performance optimization tutorial. We hope you’ve picked up a few new tricks along the way and have a better understanding of what is important when it comes to WordPress performance optimization. We set out some key principles about WordPress Hosting, Themes and Plugins which should really be at the forefront of your mind when building or running WordPress and WooCommerce websites on a day to day basis. We set out some key KPI’s for Load Time, PageSpeed and Speed Index which we largely met.
So I guess that’s it then? Not quite 🙂
A sneak peak at even faster WordPress and WooCommerce load times!
What if we wanted to go further and really take WordPress and WooCommerce performance to the next level? I think at this point we’ve reached the upper limits of what we can achieve on a Shared host. I spent a couple of hours and took a copy of our test site over to a Linode machine with 8GB of RAM running a tuned instance of nginx with a proxy cache, Redis, MariaDB and a few other speed enhancements. While we can’t improve our PageSpeed score we can certainly improved our Load time. Check it out

Woah! This is the exact same site – same code, same plugins etc. All that’s different is the server and the stack we’re running. A cloud machine with 8GB of RAM is far more powerful than any shared host, costs quite considerably more and frankly is a complete pain in the ass to setup and manage unless you’re very technically fluent in all aspects of system administration. But for those brave enough – it shows what’s possible once you outgrow your shared hosting environment and need even more speed! But that’s for a future tutorial 🙂 In the meantime if you need some help setting up a cloud machine like this I’m available for WordPress and WooCommerce performance consulting.
For most people super fast shared hosting is a huge step up from where they currently are and the cost/benefit of managing a complex cloud machine isn’t justified in the early days of a new online store. My advice is to stick with a Siteground GoGeek account for as long as you can and until you can afford to hire expensive sysadmins to manage your own servers.
So that’s it for today. Feel free to get in touch should you have any feedback on anything I’ve missed or if you have further suggestions for improvements to our tutorial. Until next time!